Yoga contributes a lot to our lives. Many diseases are cured by yoga. And if it is made a part of one’s life, then there is no disease. It spread all over the world like an awareness, it celebrates the whole world and knows about its benefits. Practicing daily yoga is a way to lead a healthy life. Doing so not only helps in fighting physical health problems, but also helps to keep your mind calm. With yoga we can also cure diseases like diabetes.
Table of Contents
Diabetes-Reason for a Bad lifestyle
Diabetes starts due to a bad lifestyle, so the first step is to change the bad lifestyle to control diabetes. The first step towards controlling the condition of diabetes is to control your lifestyle. Most of all, you have to fix meal time, which will help a lot in changing your lifestyle. Always remember that your food should be fresh, healthy and homemade. Avoid eating heavily processed foods that contain sugar, fat and other unhealthy substances.
How to prevent, control and treat diabetes with yoga
There are different types of technique in yoga, as when you are doing yoga with physical techniques known as asanas and, on the other hand, as with breathing exercise in yoga known as pranayam.
There are different types of asanas and breathing exercises that you can practice to eliminate diabetes from your body and world. Yoga is a great option to keep your mind and body healthy. By doing this, even the oldest diseases get cured easily.
Asanas Effective For Diabetes-
There are a number of asanas that are very effective for diabetes. There are different types of asanas and breathing exercises that you can practice to eliminate diabetes. Some important yoga and pranayama for diabetes as prescribed by experts are as follows-
Mandukasana–
Manduk means frog. That is, while doing this asana, a frog-shaped position appears. That is why it is called Mandukasana. Along with controlling blood sugar, it provides relief from many diseases. By doing this asana, the internal organs of the abdomen get massaged. This asana is most beneficial for diabetic patients.If diabetic patients include Mandukasana in their daily routine along with food, then it will benefit them a lot.
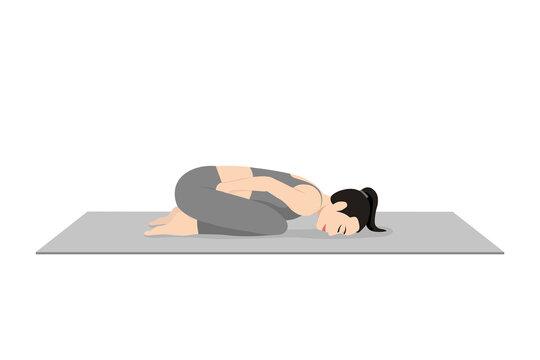
How To Do-
- First of all, bend both legs on the mat and sit on the knees in the posture of Vajrasana.
- Next, place both the hands in front and, while pressing the thumb with the fingers, close the fists and join them together and keep them near the navel.
- While exhaling, bend forward while pressing the stomach with your fist.
- After bending forward, hold your breath for a while according to your strength.
By doing Mandukasana, the amount of insulin in the body increases. Therefore, it is considered a beneficial asana for diabetic patients. Improves the functionality of the pancreas. By which blood sugar level can be controlled.
Shashankasana-
In Shashankasana yoga, due to the shape of the body like a rabbit, this asana is called ‘Shashankasana’ and ‘Hair Pose’ in English. This yoga is very useful for diabetic patients.
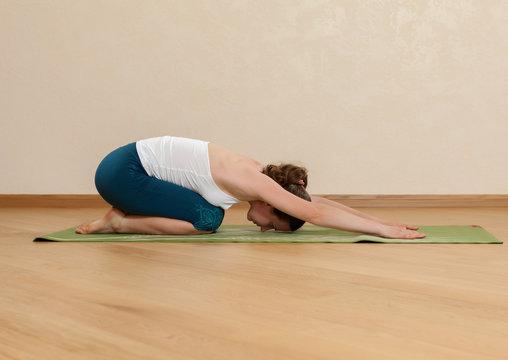
How To Do-
- First of all, sit in Vajrasana.
- After sitting in Vajrasana, while inhaling, they raise both their hands directly above the head.
- Now slowly, while exhaling, bend your hands forward without bending them until your forehead touches the ground.
- The hands and elbows should be touched with the ground.
- According to your capacity, remain in this position by holding your breath for some time.
- Inhale slowly and return to the starting position.
- Repeat this action five to ten times according to your capacity.
- With practice, the time of this yoga should be increased gradually.
Gomukhasana-
Gomukhasana- While doing this yoga, it is called ‘Gomukhasana’ due to the shape of the body being similar to the face of a cow. ‘The Cow Pose’ is called in English. It is very beneficial for diabetes.
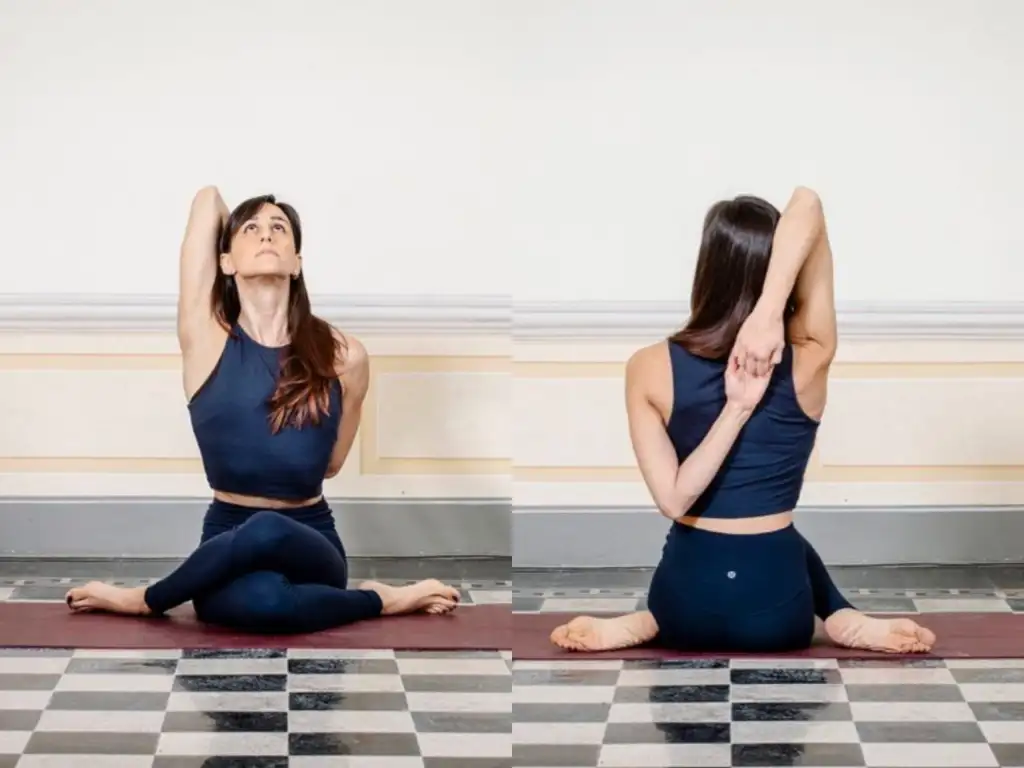
How To Do-
- First of all, sit in Sukhasana or Dandasana.
- Now place the ankle of the left foot near the right hip.
- Then cross the right leg over the left thigh, stabilize it in such a way that the knees should be on top of each other.
- Now fold the left hand behind the back and move the palms upwards.
- Now lift the right hand straight over the right shoulder and, while rotating it backwards, bend the elbows and tie the hands together. Now, slowly pull both hands in your direction.
- Keep your bent right hand up and stretched as per your capacity.
- Now, keep the body straight and keep breathing under control and try to stay in this position as much as you can.
- Do this asana three to five times by changing right and left arms and legs.
- In the end, exhale slowly and gradually sit again in Dandasana or Sukhasana.
Halasana –
The name Halasana comes from Sanskrit hala, “plow” and āsana, which means “posture” or “seat”. This asana has been named as Halasana due to the shape of the body while performing Halasana, similar to the ‘plow’ used by farmers to plow the land. It is very beneficial for diabetic patients.
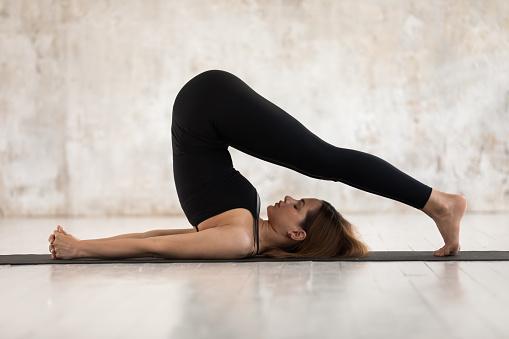
How To Do-
- Like the beginning of Sarvangasana, lie on your back on the ground.
- Keep both feet in line with each other.
- Keep your palms close to the ground near the waist.
- Keep your face towards the sky and close your eyes to relax.
- Keep the body loose
- Now inhale and start lifting the legs by shrinking the stomach.
- Exhale when both the legs form (90 degree angle) a right angle with the body.
- After getting in the position of Sarvangasana, try to keep both feet on the ground behind the head.
- .Taking the help of hands to bend the waist and back. Keeping the hands straight from the elbows and keep them behind the back on the ground.
- After stopping in this position according to your body capacity, start slowly putting your back and feet on the ground.
- The knees are not bent in the whole asana.
Suryanamaskar-
Suryanamaskar– is a simple but a very important group of twelve asanas, which is considered to have an effective role in the control of lifestyle-related diseases like diabetes and many more. It should be practiced slowly, like other asanas. The practice should be started in the early morning by facing the rising sun and bowing down to the Sun God.
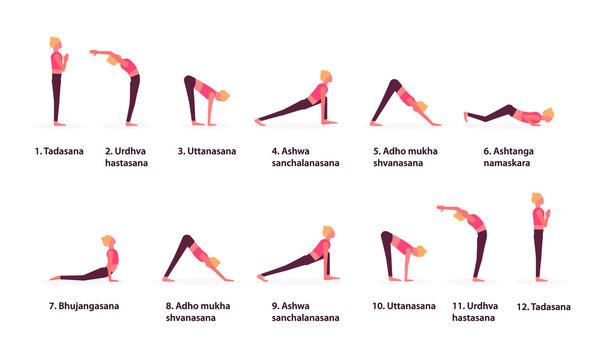
How To Do-
Surya Namaskar is a group of twelve Asanas or Kriyas whose method is as follows:-
First Step:-
Stand in a clean and quiet place, facing the sun while lying on a mat. Keep the spine absolutely straight, joining both the legs, ankles and toes. Place both the hands in front of the heart with folded hands in the posture of Namaskar. This is the complete position of the first step of Surya Namaskar.
Second Step:-
While raising both hands, move the waist, back, neck, head and arms backwards. Maintain body balance. The legs will remain straight. This is the complete position of the second action of Surya Namaskar.
Third Step:-
Bringing both the hands back down, bend the body from the waist and bend forward. Place the palms of both hands on the ground next to both feet. The legs have to be kept straight. Try not to bend your knees. This is the complete position of the third step of Surya Namaskar.
Fourth Step:-
Keeping both the palms on the ground, move the left leg as far back as possible. The right knee will remain in the middle of both hands. Look up at the sky with the chest facing forward and the neck backward. This is the complete position of the fourth step of Surya Namaskar.
Fifth Step:-
Keeping both the palms on the ground and straightening both the hands, move the right leg backwards as well. By joining both the legs together, raise the waist part and make a shape like a mountain while moving the neck and head down. Keep the head in the middle of both arms. The entire weight of the body will remain on both the toes and the palms. This is the complete position of the fifth step of Surya Namaskar.
Sixth Step:-
Keeping the palms on the ground, try to straighten the hands. Keep the lower part of the body touching the ground and look towards the sky while moving the neck backwards. This is the position of Bhujangasana and the complete position of the sixth step of Surya Namaskar.
Seventh Step:-
Place both the hands in front of the heart with folded hands in position and pray to the Sun God. This is the complete position of the seventh step of Surya Namaskar.
Eighth Step:-
This position is similar to the fifth verb. Coming again in a mountainous position, bow down to the Sun God. This is the complete position of the eighth step of Surya Namaskar.
Ninth Step:-
Keep the palms on the ground. Keeping the left leg bent at the knee and bringing it in front, keep it in between the two. Move to the right as far back as possible. Look at the chest in front. This action is similar to the fourth verb. In this, the left leg is taken back, while in the ninth action, the right leg is taken backward. This is the complete position of the ninth step of Surya Namaskar.
Tenth Step:-
Keeping both the palms on the ground, bring the right foot forward and keep it parallel to the left foot. Coming in line with the third step, try to touch the head with the knees. Both legs will remain straight.This is the complete position of the tenth step of Surya Namaskar.
Eleventh Step:-
Stand up straight. According to the second step, while raising both the hands, move the waist, back, head, neck and arms backwards. Maintain body balance. The legs will remain straight. This is the complete position of the eleventh step of Surya Namaskar.
Twelth Step:-
Standing upright, join both the hands in the posture of salutation according to the first step.This is the complete position of the twelfth step of Surya Namaskar.
After practicing the twelve asanas of Surya Namaskar, you practice it again after resting in Shavasana for a few minutes.
Pranayam Effective For Diabetes-
Pranayama (Prana), increasing the distance between two breaths, stopping and exhaling by controlling the speed of inhalation and exhalation. Holding and exhaling the breath slowly and deeply comes in the sequence of pranayama. There are some breathing exercises (pranayama) as follows-
Kapalbhati Pranayama
In kapalbhati, ‘Kapal’ means forehead, ‘Bhati’ means shining, and ‘Pranayama’ means breathing exercise.It is very effective for diabetes. In kapalbhati, fast movement of the abdomen pushes the internal organs in and out, including the pancreas, which further helps in the secretion of insulin.
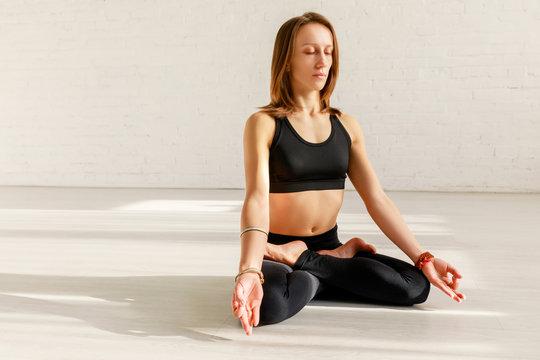
How To Do-
- Doing Kapalbhati, first sit in Vajrasana or Padmasana.
- After this, place both hands over the knees, simply in a relaxing posture or in Gyan mudra.
- Take a deep breath and, while exhaling with a jerk, pull the stomach inwards. Keep doing this continuously for a few minutes. Do it 25 to 100 times at a time. Keep increasing it day by day.
Anulom Vilom Pranayama
Anulom Vilom Pranayama is one of several Pranayama or breathing exercises. Anulom Vilom is very easy to do, and very effective in diabetes also.
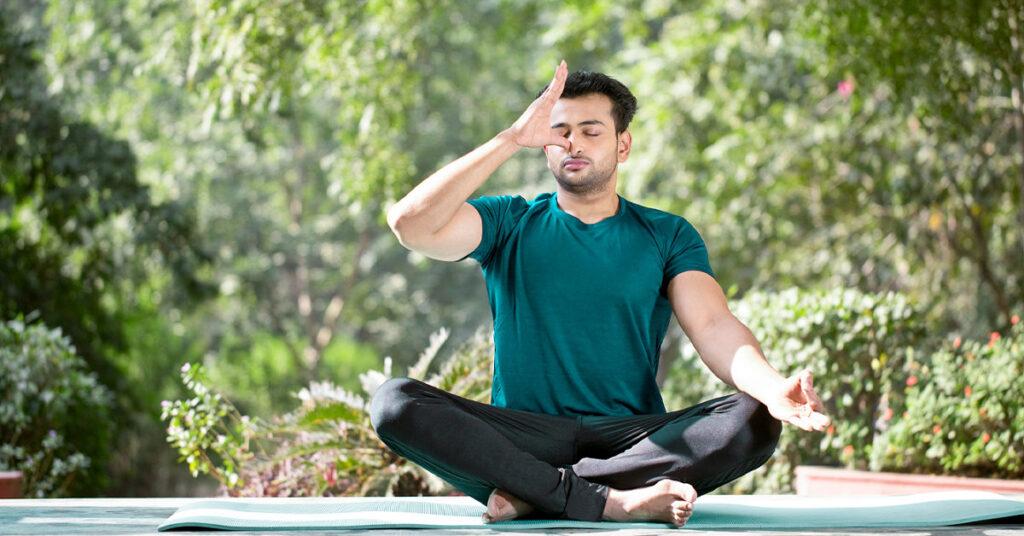
How To Do-
- Close your eyes and sit in Padmasana and rest your hands on your knees.
- Close the right nostril with the right thumb. Inhale slowly through the left nostril, inhale the oxygen as much as you can, this will fill your lungs with air.
- Remove your thumb from your right nostril. As you remove your thumb from the right nostril, just exhale.
- When you exhale, use your middle finger to close your left nostril, then inhale with your right nostril and remove the thumb from the right nostril, then exhale. Repeat this process for 5 minutes.
- Be focused and concentrate on your breathing.
- Breath alternatively in this manner for 10 rounds.
Precaution while doing Yoga or Pranayam
- Yoga and Pranayama should be done only after learning it well from a yoga expert.
- People suffering from knee pain should not do asana.
- Avoid it even if there is a problem with stomach ulcers.
- Do not do this even in problems like high blood pressure, insomnia, migraine etc.
- If there is any problem while doing yoga, the doctor and yoga specialist should be consulted immediately.
- This is not suitable for pregnant women.

